Network Filter Demo for Nitrogen6_SoloX
General
This demo application showcases a simple application-layer Network Filter utilizing two Ethernet ports. It analyzes messages received on the first Ethernet port sent by a Sender-App and applies a filtering algorithm based on a specific binary message protocol. Valid messages are forwarded to a Receiver-App connected to the second Ethernet port.
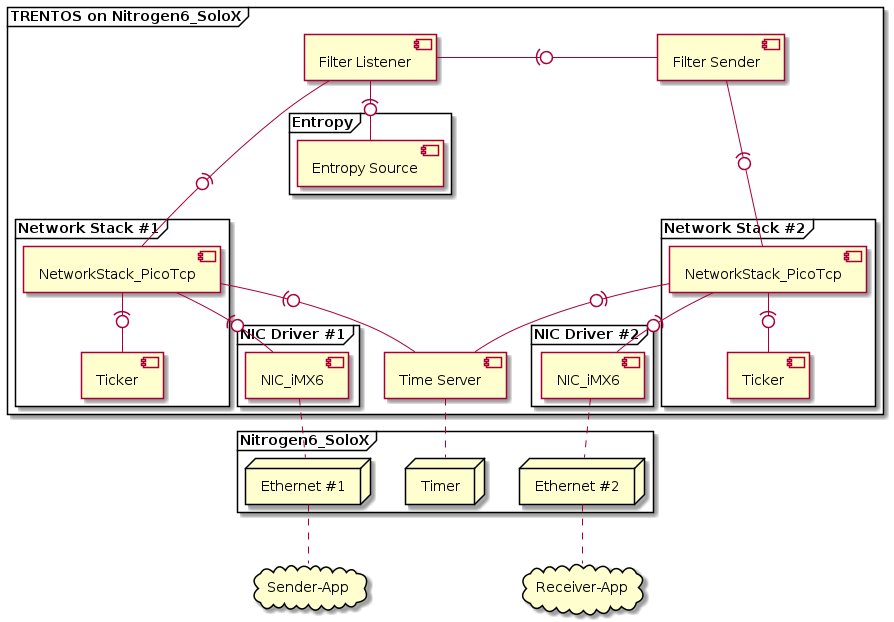
CAmkES Component Architecture

Message Protocol
The example Network Filter analyses and filters the received data based on a specific message protocol. The message protocol for the demo use case is comprised of decimal GPS coordinates (WGS84) and altitude values. It is specified as follows:
Offset |
Size |
Name / Description |
Type |
Values |
|---|---|---|---|---|
0 |
4 |
MessageType |
unsigned int32 |
23 = WGS84 coordinates |
4 |
4 |
Latitude |
Float (IEEE 754) |
min: -90.0 |
8 |
4 |
Longitude |
Float (IEEE 754) |
min: -180.0 |
12 |
4 |
Altitude |
signed int32 |
scale: 1 |
16 |
16 |
Checksum |
128 bit data |
*Sorted according to the network byte order (= big-endian).
Message Input Data Required by the Sender-App
Based on the message protocol outlined above, the input_data.txt
file found in the /host_applications/data folder provided in the
sources of the demo contains both valid and invalid messages defined to
showcase the filtering functionality of the demo system.
A valid message found in this file adheres to the outlined message protocol and contains valid data for all required fields, as defined in the example below.
# Valid messages.
Type: 23, Latitude: -14.46219, Longitude: -69.46332, Altitude: 76
Type: 23, Latitude: 48.21881, Longitude: 11.62477, Altitude: 492
An invalid message can be defined in various ways (from completely random data to merely one value of the payload being out of the allowed range). The following example shows a “raw” message containing an invalid checksum to an otherwise valid payload. The “0x” prefix indicates to the parser that the following characters in the string should be interpreted as hexadecimal digits.
# Invalid "raw" message below is a hex string made up of valid message data
# with an added invalid checksum. Should get caught by the filter.
# The valid content of the message is:
# Type: 23 Latitude: 19.07609, Longitude: 72.87742, Altitude: 14
0x0000001741989bd54291c13d0000000ee156c35f50a7337b600ea72941d1bd12
If the “0x” prefix is not added, the script will interpret that line as a string of unspecified random data as seen in the example below.
# Unspecified random data. Should get caught by the filter.
Fwmuu5ORXo2mSrGIjE7ETrSw7U5BLvO77xsn88IcXkUNC6oE0MbgrvOHHmttymVMqRLlqAvhHPSP1vf5
When running the demo (see instructions below) this input file needs to be passed to the Sender-App. The Sender-App will parse all the data from the input file into messages that it will then send to the address of the Network Filter demo system.
Hardware Setup
The Network Filter demo system is supposed to run standalone on a Nitrogen6_SoloX board, without using the trentos_test docker container, QEMU, ChanMux, or the Proxy Application.
In order to run the demo, the following is required:
A Nitrogen6_SoloX development board incl. power supply
USB-to-RS232 cable for console and logs
A micro SD-Card
Ethernet Switch
Ethernet Cables
PC running the Sender-/ Receiver-App
If the Nitrogen6_SoloX has not already been prepared with the U-Boot image you will need to follow the detailed description of how to install the required U-Boot version in the board’s internal NOR flash in the platform support chapter for the Nitrogen6_SoloX before continuing with the steps outlined below.
Before building or executing the demo it is necessary to first properly connect all the hardware components:
connect the USB-to-RS232 cable to the board as described in more detail in the platform support chapter for the Nitrogen6_SoloX.
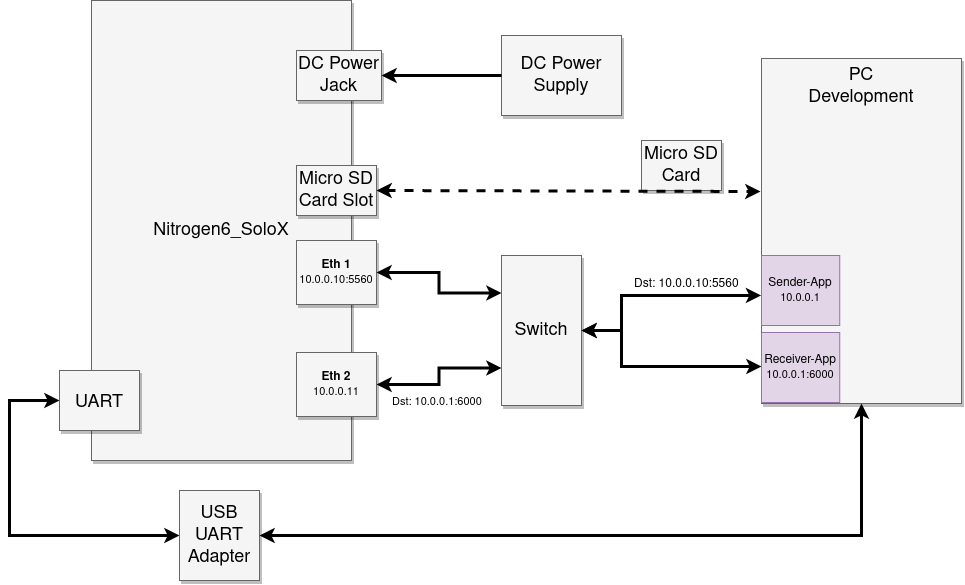
connect both ethernet ports of the Nitrogen6_SoloX board and your PC to the same network using ethernet cables and an ethernet switch.
connect the USB-to-RS232 adapter to your PC.
connect the development board to the power supply (as soon as the board is ready to run the demo system as described in the sections below).
The following diagram shows the hardware setup:

Building the Demo
For building the Network Filter demo, the build-system.sh script has to be
used and executed within the trentos_build docker container. The following
command will invoke this build script from inside the trentos_build docker
container. The container will bind the current working folder to a volume
mounted under /host, execute the script, and then self-remove.
# Entering the SDK root directory
cd <sdk_root_directory>

# Building the demo
sdk/scripts/open_trentos_build_env.sh \
    sdk/build-system.sh \
    sdk/demos/demo_network_filter \
    nitrogen6sx \
    build-nitrogen6sx-Debug-demo_network_filter \
    -DCMAKE_BUILD_TYPE=Debug
As a result, the folder
build-nitrogen6sx-Debug-demo_network_filter is created, containing all the
build artifacts.
For an in-depth discussion about building TRENTOS systems, different possible configurations, and parameters, please refer to the Buildsystem section.
Preparing the Demo
Set a Static IP Address for the Networking Interface
Configure the Ethernet networking interface of your development machine with a static IP address, so the demo running the default configuration on the board can find it in the local network. Go to the network settings of your development machine, select the Ethernet connection and change the IP settings from automatic (DHCP) to manual and apply the following configuration:
Address |
Netmask |
Gateway |
|---|---|---|
10.0.0.1 |
255.255.255.0 |
- |
Optionally Reconfigure the Network Settings of the Demo
If you wish to deviate from the provided default configuration for your network interface, you will also need to adapt the demo configuration in the following steps.
To adapt the demo, open sdk/demos/demo_network_filter/system_config.h and
change the value of FILTER_SENDER_IP_ADDR to the desired IP address (default:
10.0.0.1) you statically set your development machine network interface to.
#define FILTER_SENDER_IP_ADDR "10.0.0.1"
It would then also be necessary to change the network parameters of the
network stacks of the demo system according to your network. These
settings are also found in sdk/demos/demo_network_filter/system_config.h.
//-----------------------------------------------------------------------------
// Network Stack 1
//-----------------------------------------------------------------------------
#define NETWORK_STACK_1_NUM_SOCKETS     FILTER_LISTENER_NUM_SOCKETS
#define ETH_1_ADDR                      "10.0.0.10"
#define ETH_1_GATEWAY_ADDR              "10.0.0.1"
#define ETH_1_SUBNET_MASK               "255.255.255.0"


//-----------------------------------------------------------------------------
// Network Stack 2
//-----------------------------------------------------------------------------
#define NETWORK_STACK_2_NUM_SOCKETS     FILTER_SENDER_NUM_SOCKETS
#define ETH_2_ADDR                      "10.0.0.11"
#define ETH_2_GATEWAY_ADDR              "10.0.0.1"
#define ETH_2_SUBNET_MASK               "255.255.255.0"
Running the Demo
The Network Filter demo essentially contains three different applications that
need to run to create the message chain starting from the Sender-App and ending
(in the case of valid messages) at the Receiver-App. To monitor the messages
traveling through the whole chain, it is recommended to place all three separate
terminal windows required to run the applications next to each other on the
screen. Terminal multiplexer tools such as tmux are additionally
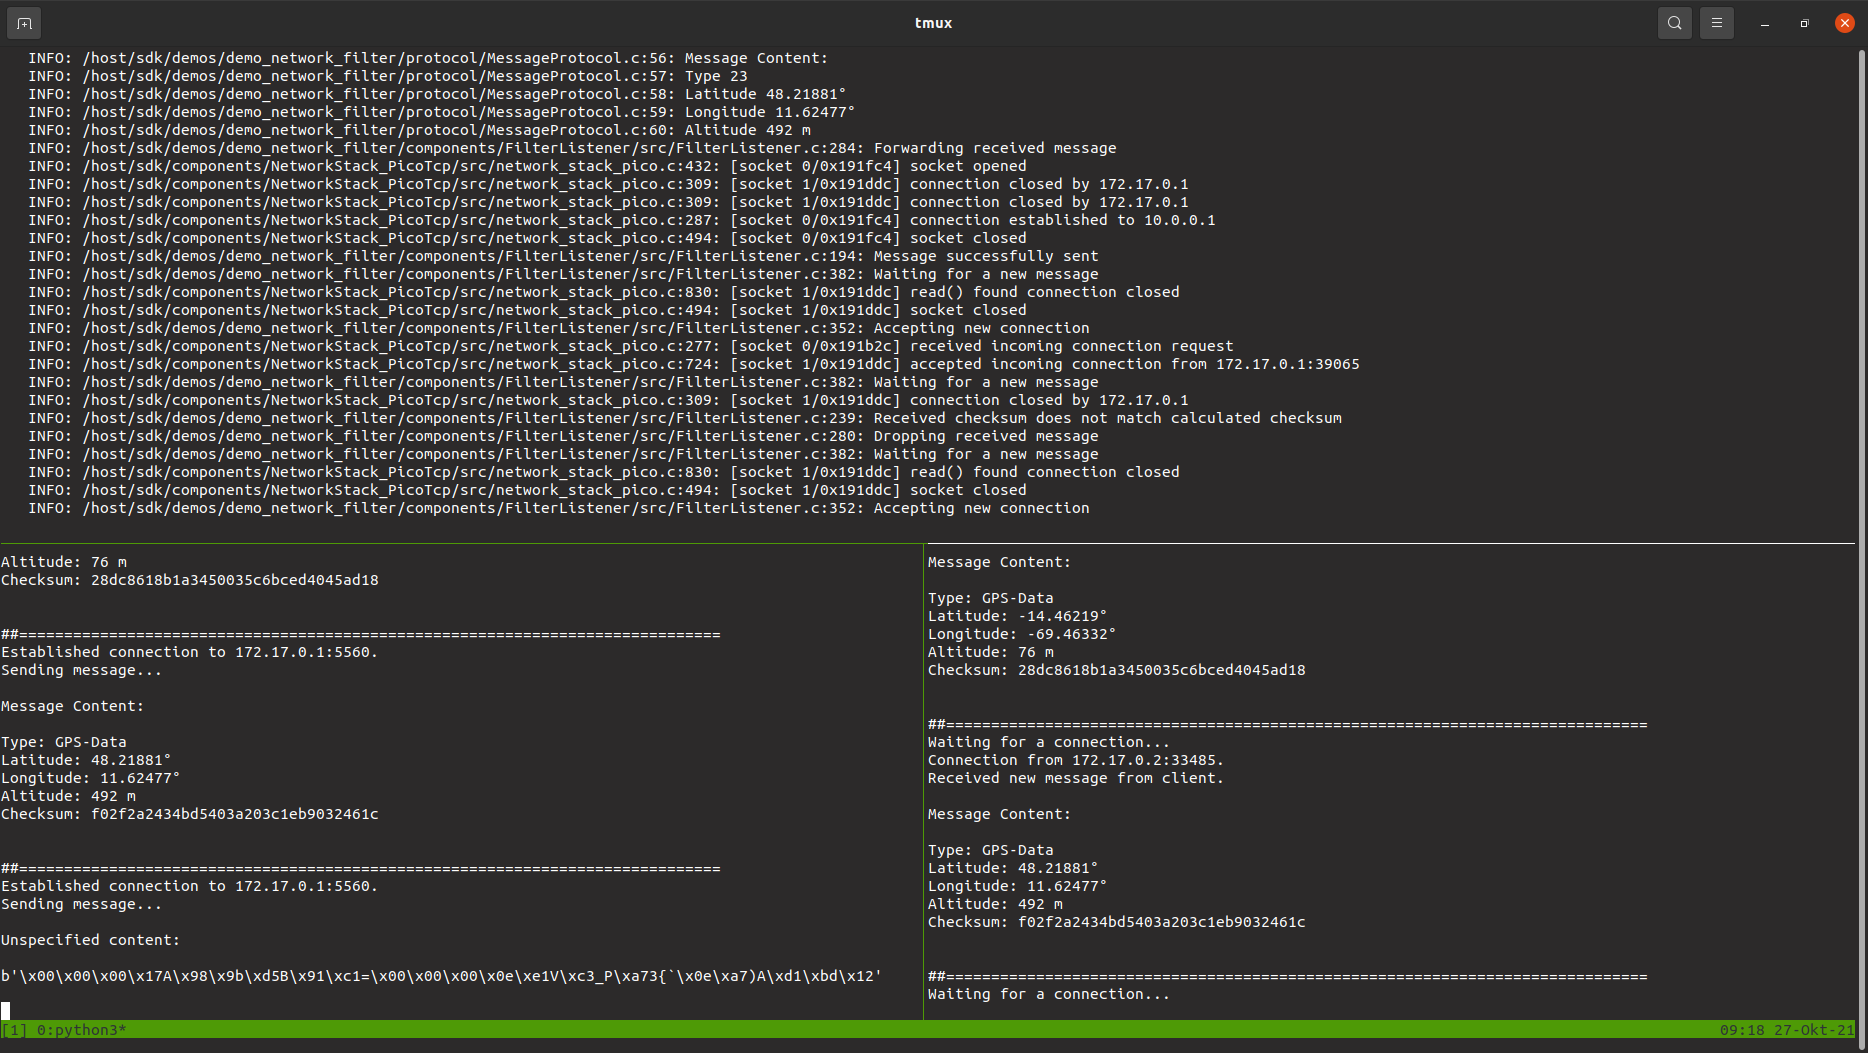
recommended for this task. The example screenshot below shows a tmux session
with a single terminal window split into three separate panes (top-center
showing the serial monitor output of the demo system running on the board,
lower-left pane showing the output of the Sender-App, and the lower-right side
showing the output of the Receiver-App).

Start the Python Receiver-App
Open a terminal window dedicated to view the incoming messages the Receiver-App receives and run the Python script and provide it with the address to listen on with the command below.
sdk/demos/demo_network_filter/host_applications/filter_demo_receiver.py --addr 10.0.0.1
On successful start-up, the script will indicate that it is ready to receive an incoming connection.
Starting Receiver-App on 10.0.0.1:6000...

##==============================================================================
Waiting for a connection...
Start the TRENTOS Network Filter System
To boot the board from the SD card, a suitable boot script has to be
placed on the card. The required boot files for the Nitrogen6_SoloX can be found
in sdk/resources/nitrogen6sx_sd_card/. Open a new terminal window and
copy the Nitrogen6_SoloX bootfiles to the SD card.
# copy Nitrogen6_SoloX bootfiles to the SD Card
cp sdk/resources/nitrogen6sx_sd_card/* <sd_card_mount_point>/
The previously built TRENTOS system image needs to be placed on the SD
card along with the boot script. The system image
os_image.elf has been created in the
build-nitrogen6sx-Debug-demo_network_filter/images/.
# copy TRENTOS system image (the Network Filter demo application) to the SD Card
cp build-nitrogen6sx-Debug-demo_network_filter/images/os_image.elf <sd_card_mount_point>/
Start a serial monitor that shows the traffic received from the
UART-to-USB adapter. One way of doing this is to use the picocom utility
with the following command.
sudo picocom -b 115200 /dev/<ttyUSBX>
Hereby, <ttyUSBX> acts as a placeholder for the specific device
representing the USB-to-UART adapter, e.g. ttyUSB0. Note that
using sudo may not be required, this depends on your Linux group
membership giving your account access to /dev/<ttyUSBX>.
Place the prepared SD card in the board and then connect the board to the power supply. As soon as the system has booted up, it should eventually stop with the following output from the serial monitor, indicating that it is ready to accept a new incoming connection from the Sender-App.
...

   INFO: /host/sdk/components/NetworkStack_PicoTcp/src/network_stack_pico.c:432: [socket 0/0x190b2c] socket opened
   INFO: /host/sdk/components/NetworkStack_PicoTcp/src/network_stack_pico.c:563: [socket 0/0x190b2c] binding to port 5560
   INFO: /host/.sdk/demos/demo_network_filter/components/FilterListener/src/FilterListener.c:352: Accepting new connection
   INFO: /host/sdk/components/NetworkStack_PicoTcp/src/network_stack_pico_nic.c:226: MAC: 00:19:b8:08:c7:bc
   INFO: /host/sdk/components/NetworkStack_PicoTcp/src/network_stack_pico_nic.c:237: picoTCP Device created: trentos_nic_driver

...
Start the Python Sender-App
Once the Receiver-App and the Network Filter system are running, open a
third terminal to start the Sender-App and view its output. Since this
app relies on input data for the messages it should send, we need to
call to the script with the --input command line parameter
followed by the path to the input file. In addition to that, we will
also specify the network address to send the messages to.
sdk/demos/demo_network_filter/host_applications/filter_demo_sender.py \
    --input sdk/demos/demo_network_filter/host_applications/data/input_data.txt \
    --addr 10.0.0.10
As soon as the Sender-App is running, it will proceed to send a message about every three seconds.
The snippet below shows the output generated by the Sender-App that in this example has already sent three messages to the Network Filter system. Since the second message shown here consists of unspecified data, this message will be caught by the Network Filter and will not be seen in the output of the Receiver-App. The other two messages shown below have both the valid structure and a valid payload regarding the defined protocol. Therefore these two messages will pass all the checks of the Network Filter and will be forwarded to the Receiver-App.
Sending all messages to 10.0.0.10:5560...

##==============================================================================
Established connection to 10.0.0.10:5560.
Sending message...

Message Content:

Type: GPS-Data
Latitude: 47.59760°
Longitude: 9.59707°
Altitude: 413 m
Checksum: 6a0c5f80de4afec6e905a17849248b69


##==============================================================================
Established connection to 10.0.0.10:5560.
Sending message...

Unspecified content:

b'jcIP0LCesok8CAoAqdanYeBPzEA2P7c1L6KhSxSbSa8gTqgCszDnIoGNrdUoOQyo9NCQjYUGvDad7ilA'


##==============================================================================
Established connection to 10.0.0.10:5560.
Sending message...

Message Content:

Type: GPS-Data
Latitude: -14.46219°
Longitude: -69.46332°
Altitude: 76 m
Checksum: 28dc8618b1a3450035c6bced4045ad18


...
Closing the Demo
Eventually, all invalid and valid messages described in the input_data.txt
will have been sent by the Sender-App and it will close with a final statement.
Final Output Sender-App:
...

##==============================================================================
Established connection to 10.0.0.10:5560.
Sending message...

Message Content:

Type: GPS-Data
Latitude: 27.98805°
Longitude: 86.92527°
Altitude: 8849 m
Checksum: 1c5586e2c782bd38778f3862768d06af

All messages successfully transmitted.


...
Final Output Receiver-App:
...

##==============================================================================
Waiting for a connection...
Connection from 10.0.0.11:34387.
Received new message from client.

Message Content:

Type: GPS-Data
Latitude: 27.98805°
Longitude: 86.92527°
Altitude: 8849 m
Checksum: 1c5586e2c782bd38778f3862768d06af


##==============================================================================
Waiting for a connection...

...
Final Execution Output:
...

   INFO: /host/sdk/demos/demo_network_filter/components/FilterListener/src/FilterListener.c:382: Waiting for a new message
   INFO: /host/sdk/components/NetworkStack_PicoTcp/src/network_stack_pico.c:309: [socket 1/0x190ecc] connection closed by 10.0.0.1
   INFO: /host/sdk/demos/demo_network_filter/protocol/MessageProtocol.c:56: Message Content:
   INFO: /host/sdk/demos/demo_network_filter/protocol/MessageProtocol.c:57: Type 23
   INFO: /host/sdk/demos/demo_network_filter/protocol/MessageProtocol.c:58: Latitude 27.98805°
   INFO: /host/sdk/demos/demo_network_filter/protocol/MessageProtocol.c:59: Longitude 86.92527°
   INFO: /host/sdk/demos/demo_network_filter/protocol/MessageProtocol.c:60: Altitude 8849 m
   INFO: /host/sdk/demos/demo_network_filter/components/FilterListener/src/FilterListener.c:284: Forwarding received message
   INFO: /host/sdk/components/NetworkStack_PicoTcp/src/network_stack_pico.c:432: [socket 0/0x190bfc] socket opened
   INFO: /host/sdk/components/NetworkStack_PicoTcp/src/network_stack_pico.c:287: [socket 0/0x190bfc] connection established to 10.0.0.1
   INFO: /host/sdk/components/NetworkStack_PicoTcp/src/network_stack_pico.c:494: [socket 0/0x190bfc] socket closed
   INFO: /host/sdk/demos/demo_network_filter/components/FilterListener/src/FilterListener.c:194: Message successfully sent
   INFO: /host/sdk/demos/demo_network_filter/components/FilterListener/src/FilterListener.c:382: Waiting for a new message
   INFO: /host/sdk/components/NetworkStack_PicoTcp/src/network_stack_pico.c:830: [socket 1/0x190ecc] read() found connection closed
   INFO: /host/sdk/components/NetworkStack_PicoTcp/src/network_stack_pico.c:494: [socket 1/0x190ecc] socket closed
   INFO: /host/sdk/demos/demo_network_filter/components/FilterListener/src/FilterListener.c:352: Accepting new connection

...
Other than the Sender-App the Receiver-App will not stop automatically and can be quit by pressing <Ctrl-C>. If you wish to stop the execution of the Sender-App at an earlier point, you can also quit it by pressing <Ctrl-C>.
To exit the serial monitor provided by picocom press <Ctrl-A>
followed by <Ctrl-X>.